
Hat Making Tools & Materials

Hat making made easy…
Most people who want to start making their own hats feel somewhat intimidated by the process and expect it to be a hard craft to master.
There are many levels, methods, and kinds of millinery it really depends on what you want to achieve and if you want to use only traditional/historical methods from the base up or you just want a quality finished hat that looks the part and holds up to wear and use.
The hat patterns and methods in the tutorials have been used for years in theatrical and film costuming. In these industries, garments and props are made to both look good, be robust, and can be of varying quality depending on the requirements.
You should feel proud for your hats to be well finished inside and out, and the methods given here will certainly produce hats good enough to sell or wear at any event, wedding, convention, or theatre production.
There is no right way, most historical pattern books and articles we have read all have their own methods. Many of these patterns are from historical French originals, but the methods are not.
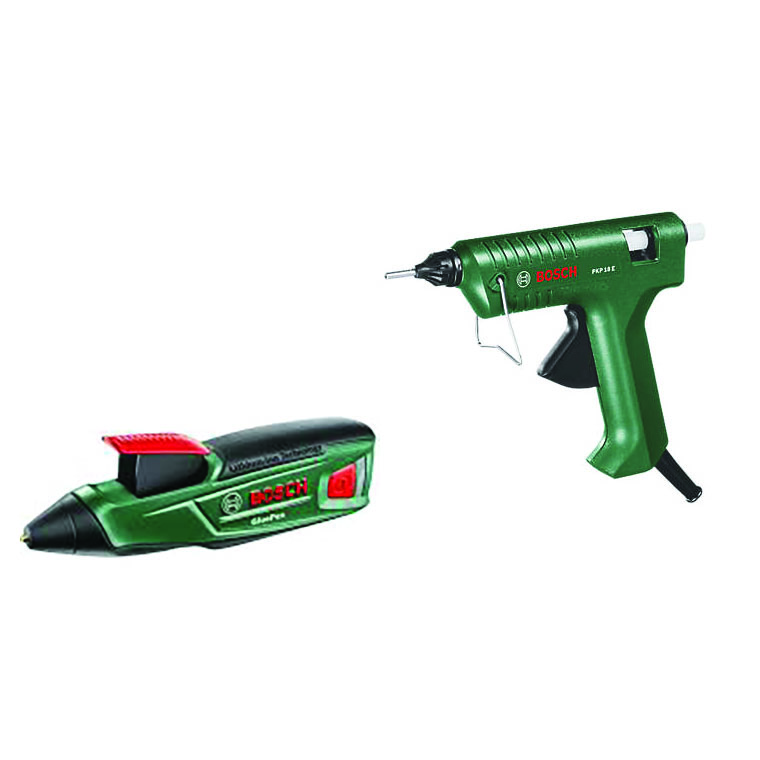
Glue Gun
Try to avoid glue snobbery over sewing when making buckram hats. Many old French millinery books from 1876 to the 1950s all have gluing methods along with hand sewing. There was more boiled hoof glue, soldering, wire twisting, botching, and make-do methods happening under the pretty coverings of some of the historical hat samples than you would imagine.
The truth is hot glue guns are simply brilliant for making hats.
Some of our hat patterns can be made with zero sewing, and some do need either hand sewing or machine sewing. They will all be easier with a glue gun, preferably a decent make with a fine nozzle such as the Bosch. In a perfect world, it’s best to have both mains powered and the smaller battery glue guns. The long fine nozzle is perfect for the crown seams using my hat-making former. and the battery is more delicate for adding embellishments and decorations to finished hats

The Exclusive Hat maker
Years ago, after a theatre order of 200 hats to be made in two weeks, we developed a hat-making jig machine to speed up the hat-making. Creating the perfect seams between crowns and sides every time.
Originally there was one complete machine for each different shape of the hat, then when the ‘machine’ was developed it evolved into a multipurpose machine with separate plate inserts for different hat models and styles. There is now a mini hat version and a full-sized hat model.
Of course, all the buckram patterns can be made without using the hat-making machine. They can be hand sewn or held by hand and glued: but if you want to make hats to sell or just make perfect hats every time for yourself it is well worth the investment. Due to some work changes throughout the pandemic of 20/21/22, it’s not currently in the shop so please use the contact us button if interested in purchasing one or seeing more of the functionality.

Buckram
Millinery buckram comes in many weights, including lightweight or baby buckram (often used for children’s and dolls’ hats), single-ply buckram, and double buckram (also known as theatrical buckram or crown buckram).
You should find buckram online, and many good Facebook Millinery groups around the world can help with local suppliers.
Crown buckram is the recommended base material to make all these hats, but as long as it has one side adhesive then a lighter buckram can be used.
For some of the miniature hats, you can even use the buckram that comes on a roll in upholstery suppliers for tiebacks and pelmets. If you really can’t find any buckram at all then stiffen denim or canvas with a PVA wood glue and allow it to dry fully (cheaper watered-down craft PVA may not hold enough stiffness when dry).

Iron or Table press & other small tools
A standard home iron to press the buckram to the fabric. If you have a table style press even better. If you plan to make a lot of hats or sell hats then I really recommend investing in a table press, as large as you can afford. They often come up used or second hand at very reasonable prices.
Other tools are scissors, pencil, straight edge/ ruler, clamps or fabric grips pegs.

Contact Adhesive
Contact adhesive is a solvent-based glue. You apply to both sides of the material, allow to rest until the solvent has evaporated and press the two pieces together.
It forms an incredibly strong bond. It is also known as contact cement.
It’s perfect for textiles and hat making. However, the downsides are that it must be used in a well-ventilated workspace and is NOT suitable for young children.
It is available in liquid form and gel. The gel means you can spread it without drips onto your hats. I prefer this gel type for hat-making, it’s just less messy and slightly less stinky.
A no toxic non solvent alternative is a liquid latex. It is not easy to work with as can seep through textiles, takes much longer to become tacky and you need to leave long periods with clamps to set, but will bond fabrics and is safe for children and completely non-toxic.

Outer fabrics
Almost any dress fabric or outer fabric can theoretically be used for the outside of a hat. If you are using my method the material MUST be capable of withstanding a hot iron. I prefer natural fibres as they press well, absorb adhesive and are very hardwearing.
Always heat test your fabric on scrap with a hot iron before cutting out your hat if using my construction methods. If you plan to make your hat buckram base first and then cover it afterwards more delicate synthetics fabrics can be used.

Hat linings
Linings for hats can be a variety of fabrics. The main thing to remember is to keep them lightweight and fine. In fact if you want to pleat or ruffle the lining the lighter the better (chiffon scarves can be used to great effect). Otherwise, most dress linings are suitable from satin to cotton.

Brim Edge Bindings
The binding for the brim edges must be bias binding, meaning it is cut diagonally across the grain to allow for smooth shaping around the curves.
I use 20mm to 22mm satin bias for most hats, but I also make my own if I want to match a fabric using a simple bias binding maker. These come in different widths and are useful for all sorts of sewing and craft projects.
